If you are a homeowner with a growing family or business you will eventually need more space to meet your needs. If moving to another location is not an option then you will need to adapt your current dwelling to make better use of the available space. Perhaps you rent a house or a room that you have to share or you simply have not made a final decision on a permanent change and need a non-permanent solution to divide an area for the time being. Either way, a make-shift barrier that does not attach to the buildings frame and is easily removed with little stress or mess just might be the way to go. Note that if you rent, be sure to check with your landlord or property owner. If you own the building be sure to check on local regulations and building codes before starting any construction project.
MATERIALS NEEDED TO BUILD AN INTERIOR WALL DIVIDER :
- Sill seal
- 2x4s (quantity and lengths depend on wall size)
- Wooden shims
- Drywall
- Nails or screws
TOOLS:
- Circular saw
- Drill
- Hammer
- One Helper
You might not be familiar with Sill seal. It is simply a “Fiberglass or foam insulation installed between the foundation wall and sill (wood) plate designed to seal any cracks or gaps.” For this use it acts as a protector for the existing floor, walls and ceiling and as a “foundation” for your make-shift barrier. You will need to determine the areas of contact between the barrier and existing surfaces and apply the Sill seal on those surfaces prior to the barrier construction. So let us begin….
STEP 1
The barrier frame is made of four 2 x 4s cut to length. The top and bottom 2 x 4s are called the “plates” 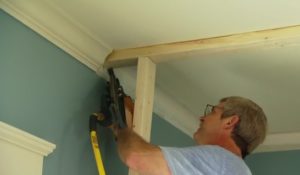 and will press against the floor and ceiling to form the vertical margins of the barrier. The horizontal margins are called the “end studs”. The plates can be cut to any desired length but special care must be taken with the measurement and cutting of the end studs due to any variances in the ceiling to floor height along the barrier. It is best to measure the left and right heights separately and then subtract three (3) inches from each measurement. The end studs are then cut to their respective lengths.
STEP 2
Place the bottom plate atop the sill seal that should already be applied to the floor. Then, you will need a helper to hold up the top plate to the ceiling where the sill seal should already be applied. The end studs can then be wedged into place to line up with the sill seal already applied to the existing walls. It is OK to gently use the hammer to obtain a tight fit between the plates but do not worry if the end studs are a bit too long or short. A circular saw or a sander can be used to shorten the studs as needed and wooden shims can be used to obtain a snug fit.
Step 3
The perimeter of the make-shift barrier is now formed so the next step is to secure the end studs and plates by using nails or screws. Note that screws 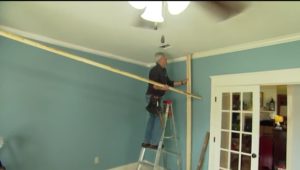 are easier to remove when you decide to take the barrier down. Securing the top plate to the nearest ceiling joist will give extra stability and is advised if you have large pets or kids or if the barrier is to have a door.
Step 4
To complete the make-shift barrier the remaining studs are placed at intervals of 16 or 24 inches. You also have the option to add batt fiberglass insulation between the studs to reduce any noise from one side of the barrier to any ears on the other side. The final step is to add drywall panels using screws for easy removal when the barrier is removed.
Step 5
If you are satisfied with the look of unpainted drywall then your project is completed but most folks choose to paint or even wallpaper the barrier to 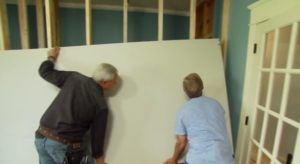 make it resemble the permanent walls. You can even install baseboards and ceiling trim if you are willing to put forth the extra effort to remove these items when the time comes to take down the make-shift barrier. It’s your space so make it special for you and your family.